There are numerous articles on internet which discuss the same topic , but curiously most of them are discussing on the third party application to set up your own wi-fi hot spot. This post is an attempt to discuss the in built feature of windows 7 to convert your wired internet or 3g connection to a shared access point for your friends or business colleges .
Background :
Situation # 1: There are numerous occasions in which you need to through up your own wi-fi hot spot. May be your ADSL or cable internet connection does not come with a wi-fi enabled router but use a modem that directly attaches to your desktop, but your tablet or smart phone only support a wi-fi access than the typical Ethernet connection.
internet connection software is there in Microsoft products from windows 98 second edition onward . Mostly we use the ICS to share your internet over a wired network. But the same can be used to share your wired connection to a wireless network , converting your laptop or desktop to a wireless access point.
Situation # 2:
You have a 3G connection available as a USB dongle which you wish to share with your friends. Normally your high end routers have option to directly plug the 3G dongle to it, but normally it is a costly solution and these routers does not support all these dongles and anyway our discussion here is to avoid these routers altogether and use our laptop for the same function.
Current Scenario
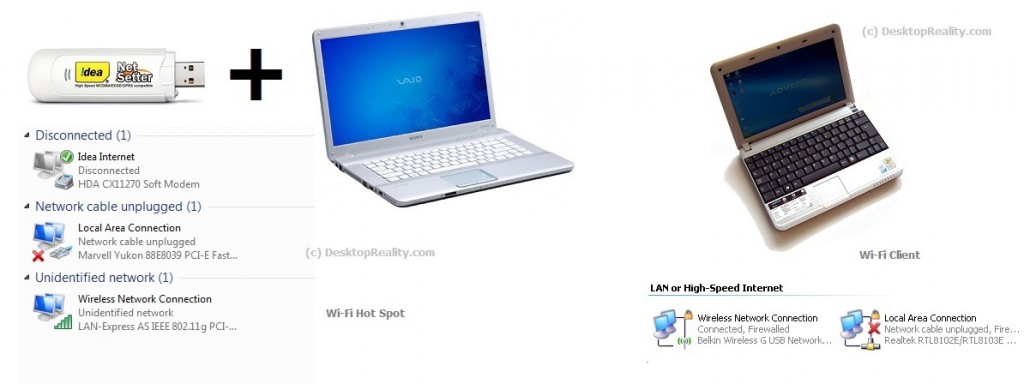
To experiment with setting up the wi-fi hotspot with build in feature of windows , we have done a basic setup with two wi-fi enabled laptops and a idea net setter 3G dongle , So we are explaining the situation #2 . Instead of this 3G dongle you can also use the wired broadband connection as discussed in situation # 1
The sony vio laptop installed with windows 7 ultimate is used to create a wi-fi hot spot. An idea netsetter 3 g is installed on the machine and will show up as a connection in the Control Panel\Network and Internet\Network Connections refer to the above image for the configuration details . The wired connection on the exhibit is disconnected . If a wired broadband is used as discussed on the Situation # 1: , the Wired connection will be enabled for the procedure .
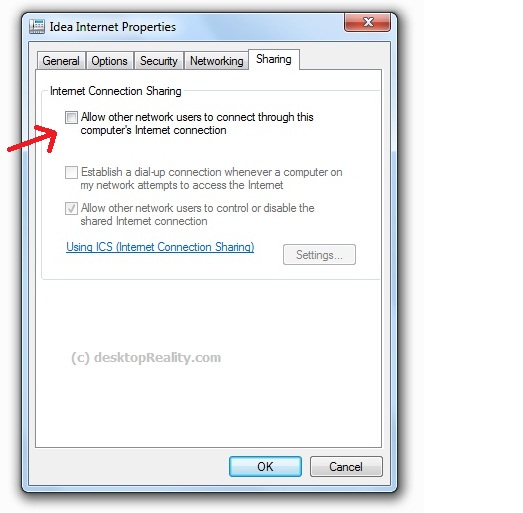
Now select the properties of the 3 G connection ( or the LAN if you are using a wired broadband )
Select the sharing option and enable Inter connection sharing by checking the box on ” allow other network users to connect ..” option . This will enable the DHCP and NAT function on the connection we selected and the system will be ready to share the internet to the connection we are going to specify.
Now select the wireless connection as the preferred home networking connection . This will change the IP address of the wireless adapter to 192.168.137.1 which is the range used for ICS in windows 7 ( For the case of a ICS in windows XP machine , the IP was 192.168.0.1) .
Now we have to convert our wireless connection to ad-hoc so that the the connection will be ready for receiving the users over the network .
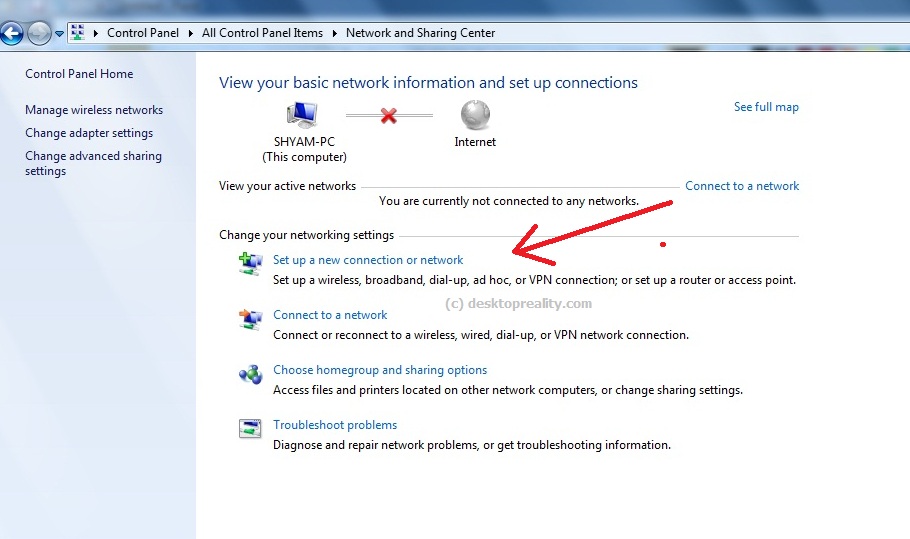
go to network and sharing center and select the option to set up a new connection or network
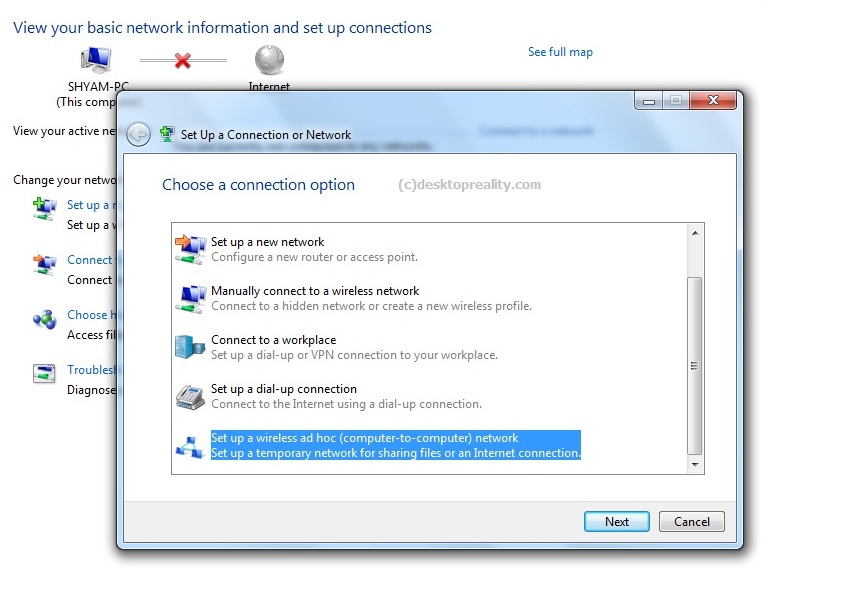
Now select the option to setup an ad-hoc network
Select the SSID , the preferred encryption method and the encryption key for the new wireless connection and finish the procedure
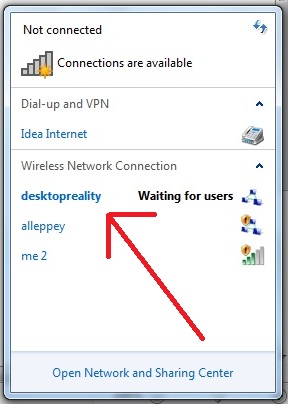
Now your connection will be visible on the system tray area .
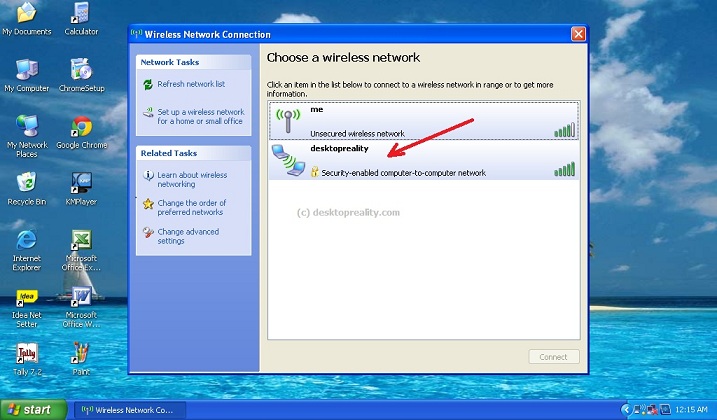
On the client side , we are using a XP machine . It does not matter which OS you are using on the client side . select the wireless network named Desktopreality which is now showing on the wireless configuration window as shown below , type in the security code you have given and the WiFi adapter will connect to the network on your windows 7 machine and ip address for the adapter will be supplied by the DHCP service of the ICS on windows 7 and you will get 192.168.137.2 as the IP .
and that’s it. Finally you have a wi-fi hot spot set up with out using any costly router hardware or any kind of third party software . The final result is shown below .




Hello Sir,
Can i use the same procedure to share internet with my wifi enable phone & laptop ?
Yes , you can . The 3G dongle which used is just another phone with out voice capability
Hello, could you describe procedure of making a ubuntu laptop as a wi-fi hot-spot ?
I am not really comfortable with Ubuntu , so no posts on it on recent future, Hope you can try
I tried with Samsung Galaxy S 7562, but wifi connection is fluctuating…
is it possible to use the same procedure on desktop also?
Hello sir,
i want do do exactly reverse. I have a laptop which access internet through wifi. I want to make a wired connection to access internet on desktop. OS on Laptop and desktop is WinXP. I tried to follow same steps. After sharing connection my internet is not accessible on both laptop and desktop. Again after deselecting sharing everything is fine internet works on laptop normal.
Sir, Good morning. I read this article many times, then tried to connect my Samsung Tab-GT 3100 with Compaq cq42 laptop wired BBand net. Everything OK. Only can not see net in Tab. Pl do help. Regards.
AKGhosh
65 yrs age. Mech Eng. Asst Prof Of JIPT, India
Date-15-09-2012
with windows starter?
whenever i click next after filling up the necessary fields I am always getting a message that it could not set up the network. How do i come up this problem
it says wifi could not be set up !! “( what to do ??
wifi is set !! but i have a proble .. the wifi is not showing up in the wireless connections are ! the wifi 1..!!cant make my cell fone access it
I followed the same procedure as given above, but it shows error in changing settings in sharing tab as “error:765 a lan connection is already configured with the IP address that is required for automatic IP addressing”
Thanks. It really helped me a lot.
Hi, nice to know there is such a nice facility in windows 7… my situation is like i want to connect ma samsung galaxy S2 to this settings… i did wat ever you said here and also cud c connection in network… bt my phone is not detcetg this wifi.. u have any idea why its so… seeking a gud hand of help for this..
Hi. I tried but my Samsung phone couldn't find the adhoc network..
download and install,( connectify).. all the best
hi.
i tried with ur instructions…………bt client user do not have ” no internet access”
Hello sir,my phone did not recognize this wifi would u tell why is it so?
sir i tried this steps…but client usb wifi device not provide internet connection…
Hello Mr. Bhaskar, u can use Connectify Hotspot Pro (or any other hotspot maker). This is the best way to create wifi hotspot with your laptop/desktop. I am using one usb modem and sharing the connection in 2 laptoos, 1 mobile and 2 tablet
Hi all
I followed these steps to make my laptop as Wifi Hotspot and I am using TATA photon on my laptop (Windows 7 )
1) click start in search type CMD it will show you command prompt right click on that and select RUN as Administrator
2) run netsh wlan set hostednetwork mode=allow ssid=thisisagenericssid key=opensesame
where SSID= can be any name that you device will see when it search for Wifi connection
key = Password that your device will use to connect to Laptop
this command will create one WIFI adaptor with name Wireless Network Connection X
Where X will be any number
3) Press window + R type ncpa.cpl . It will show all the adaptors
4) Right Click on USB Dongle adaptor . Select Properties
in my case USB Dongle adaptor was TATA Photon
5) Click on Sharing Select
Allow other networks user to connect through this Computer’s connection
Select Drop box and then select Wirless Network connection X
6) Again Open the Command prompt as mentioned in STEP 1 run the below command
netsh wlan start hostednetwork
7) Enable and disable your USB Dongle Adaptor and Wireless Network Connection X Adaptor
Connect your Device and enjoy browsing on cellphone
hello sir pc se andorid par net use karna hai kaisi hoga sir plese reply
idea 3g hai sir
how to turn off the wifi hotspot of sony vaio laptop
how to turn internet connection off (wirelles hotspot)..i have on but i dont know to turn it off
pleaase help me and tell how to turn off the wifi hotspot of sony vaio laptop
can one use windows 7 home basic for the same and a mts dongle??
please reply